Category Archives: Sweet Things

It’s the Great Pumpkin

SemiFreddo

My sophomore year at Northwestern, my roommate Cindy and I lived in an off-campus apartment. Pies were a big thing at our place. I don’t remember why, but we frequently had pie. Pumpkin was a favorite. Anyway.

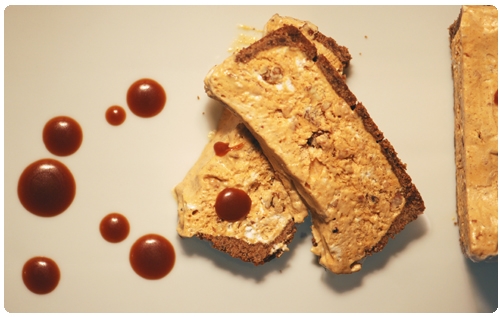
Thanksgiving is a few days off, but this year, instead of pumpkin pie (to hell with tradition!), I’m making pumpkin semifreddo. Semifreddo, if you’ve never experienced it, is like meringue and ice cream falling in love. I tested the recipe a few weeks ago to make sure it would taste—and look!—good. Approved!

PUMPKIN & PECAN SEMIFREDDO with BOURBON CARAMEL SAUCE
Adapted from Bon Appétit, November 2002

Very Important Notes:
This looks like a long recipe, but it’s fairly easy—plus, you can make it a couple of days before Thanksgiving!

Special equipment: You’ll need a candy thermometer to temp the sugar syrup. If you’re using a hand mixer to beat the whites, you may need a second person to help you pour in the hot syrup.

Caramel sauce isn’t complete without a splash of bourbon. I add 2 tablespoons, but, feel free to leave it out if you’re a teetotaler. You’ll need about 15 supermarket variety gingersnap cookies for the crust—I’ve added toasted pecans and salt for good measure. For the filling, I’ve made a few adjustments to the spice measurements.

For the Crust
1 cup gingersnap (or chocolate wafer) cookie crumbs
¼ cup toasted pecans, chopped
2 tablespoons packed golden brown sugar
3 tablespoons unsalted butter, melted
¼ teaspoon salt

– Line a 9¼ x 5¼ x 3-inch metal loaf pan with plastic wrap.   To make the cookie crumbs, break the gingersnaps into pieces and pulse in a food processor until finely ground. Add the toasted pecans and salt and pulse once or twice to combine. With the processor running, pour the butter through the tube and process until the mixture is moist. Press the mixture onto the bottom and 2 inches up the sides of the prepared loaf pan. Place the loaf pan in the freezer.

For the Filling
¾ cup canned pure pumpkin
1 tablespoon honey
½ teaspoon ground ginger
¼ teaspoon ground cinnamon
1/8 teaspoon ground cloves
1/8 teaspoon ground cardamom
1/8 teaspoon ground nutmeg
1/8 teaspoon ground allspice
1 cup granulated sugar
¼ cup water
1½ tablespoons light corn syrup
4 large egg whites, at room temperature
½ cup toasted pecans, chopped
½ cup English toffee bits

– In a large bowl, whisk together the pumpkin, honey, and spices. Set the bowl aside.

– Stir the sugar, water, and corn syrup in a medium saucepan over low heat until the sugar dissolves. Increase the heat to medium-high and let the syrup boil 8 to 10 minutes or until it registers 248˚F on the candy thermometer.

– While the syrup boils, place the egg whites in a clean, dry mixing bowl (if you’re using a stand mixer/KitchenAid, use the whisk attachment). Beat the whites on medium speed with an electric mixer until they loosen, about 1 minute. Increase the speed to medium-high and whisk until soft peaks form, 2 to 3 minutes. Now you’re going to add the syrup—don’t be scared!—very carefully and slowly, start pouring the hot syrup in, with the machine still running. Beat the mixture until the outside of the bowl is cool to the touch and the whites are thick and glossy, about 7 minutes.

-Add 1/3 of the meringue to the reserved pumpkin mixture and fold it in with a rubber spatula until it’s completely incorporated. Fold in the remaining mixture—this time you don’t want to over-mix; just fold the whites into the pumpkin, turn the bowl about 90˚, and repeat the folding action. Do this a few times until the mixture is just combined. Fold in the pecans and toffee bits and spread the mixture into the frozen gingersnap crust. Cover the semifreddo with plastic wrap and freeze at least 8 hours and up to 4 days.

Bourbon Caramel Sauce
1 cup granulated sugar
¼ cup water
2 tablespoons light corn syrup
½ cup whipping cream
½ stick (1/4 cup) unsalted butter, cut into 4 pieces
¼ cup sour cream
1 teaspoon vanilla extract
¼ teaspoon salt
2 tablespoons bourbon

– Stir the sugar, water, and corn syrup in a medium saucepan over low heat until the sugar dissolves. Increase the heat to medium-high and let the syrup boil until it is a deep amber color, about 8 minutes. Remove the pan from the heat and whisk in the cream, butter, and sour cream. Return the pan to the heat and stir in the vanilla, bourbon, and salt. Cook 1 to 2 minutes, just until the sauce is smooth.  When ready to serve the semifreddo, heat the sauce a bit.

– To serve the semifreddo: Wipe the sides of the loaf pan with a towel dampened with hot water. Invert the semifreddo, then turn over and cut into slices. Serve with the warm caramel sauce.

When Life Gives You Limes

I found a recipe for a “Key lime meringue tart” in a recent issue of Bon Appétit. The photo was gorgeous and the title sounded swank and modern. I’d been craving something citrus-y and custard-y and am crushing on meringues (despite years of gagging at the very sight of them)—it was fate. But, as I stared longingly at the picture and read the title over I recognized something I knew very well—I grew up on “Key lime meringue tart,” knowing it as “pastel de limón,” which technically translates into lemon pie. No swagger or bragging…Our recipe wasn’t ahead of the curve or attempting to reinvent the classic. The fact is, there are no lemons in Nicaragua, just limes and tiny little Key limes known as “limones criollos.”

Though I remember my pastel de limón warmly, it had a few pitfalls. The crust could be soggy, the filling like unnaturally colored Jell-O pudding. If I remember correctly, the filling was more like pudding than curd—milk and cornstarch-based. The recipe I made is a Frankensteined mess of a pie crust I always use, a lime curd that borrows from the Bon Ap, recipe and a Cook’s Country lemon squares recipe. I loved it—you’ll love it. I liked it so much that I made for a dinner party and didn’t even offer my guests an extra piece to take home. Rude little pig. Tsk, tsk.

PASTEL DE LIMON

For the Crust (for an 8-inch diameter tart pan with removable bottom)
200 grams all-purpose flour (1 cup + 6 tablespoons)
3 tablespoons sugar
½ teaspoon salt
8 tablespoons cold unsalted butter, cut into small pieces
1 egg, lightly beaten
Ice water

– Combine the flour, sugar, and salt on a clean, dry work surface. With a bench scraper, cut in the butter in until it resembles wet sand. Alternatively, combine the flour and salt in the bowl of a food processor and add the butter. Pulse until the mixture resembles wet sand.

– Form a well in the center of the flour mixture and pour in the egg plus 1 tablespoon ice water. If using a food processor, add the egg and water and pulse just until the mixture comes together. If the mixture appears very dry and crumbly, add water, 1 teaspoon at a time, until the mixture is cohesive but not overly wet.

– Bring the dough together with your hands. Pinch off pieces of dough (about 2-inch pieces) and with heel of hand extend on surface. This method, called fraisage, ensures that the butter is evenly distributed in the dough. Shape the dough into a disc and wrap in plastic. Refrigerate for 30 minutes.

– On a lightly floured surface, roll the dough out to about 10 inches in diameter. Gently transfer the dough to the tart pan.  Press the dough into the pan, making sure to fill the ridges. Use kitchen shears or a paring knife to trim off any excess overhang and lightly dock all over with a fork.  Transfer the lined shell to refrigerator and chill 30 minutes, then, freeze for 20 minutes.  Preheat the oven to 375˚F.

– Line the frozen shell with foil or parchment paper (this is not wax paper!) and fill it completely with pie weights or dry beans. Bake until the dough looks opaque, 20 to 25 minutes. Transfer to a cooling rack.

– Reduce the oven temperature to 350˚F.

For the Curd
Pulsing the sugar and the zests adds an extra—well, zest! to the custard. I won’t judge you if you opt to ignore the step, though. Prepare the curd while the tart shell bakes. Save the egg whites for the meringue.

4 large eggs
3 large egg yolks
½ cup sugar
¼ teaspoon salt
1 tablespoon lime zest
1 tablespoon lemon zest
1/3 cup lime juice
¼ cup lemon juice
4 tablespoons unsalted butter
3 tablespoons heavy cream

-Process the sugar, lime and lemon zests in a food processor until zests are thoroughly broken down.

-Whisk the eggs, egg yolks, sugar, and salt together in a medium saucepan. Add the lime and lemon zests, lime and lemon juices and cook over medium-low heat, stirring constantly, until thickened and the consistency of pudding, 8 to 10 minutes. Strain the curd into a medium bowl. Add the butter and cream and stir until completely incorporated.

-Pour the filling into the blind-baked crust and bake about 15 minutes until set. Transfer tart to a cooling rack and cool to room temperature, about 1 hour. Transfer to refrigerator and chill completely, at least 2 hours.

For the Meringue
If using a stand mixer, use the whisk attachment.
4 large egg whites, at room temperature
¼ teaspoon salt
2/3 cup sugar
¼ cup powdered sugar
1 teaspoon vanilla extract

– Place the whites and salt in a clean, dry mixing bowl. Beat the whites on medium speed with an electric mixer until they loosen. Increase the speed to medium-high and whisk until soft peaks form, 2 to 3 minutes. Slowly add the sugar and powdered sugar and continue to whisk until stiff, glossy peaks form, 2 to 3 minutes more. Add the vanilla and whisk to incorporate.

-Top the chilled tart and bake at 450˚F until golden, 6 to 8 minutes. Serve.

Pineapple Express

Pie crust can be daunting. I know numerous cooks, professional and amateur, that don’t relish the thought of making it. I’ve always found making pies a soothing activity, but did have a lousy, nightmarish episode with crusts recently that almost made me break out in hives. Anyway. I won’t make you break out into hives or develop an eye twitch. This pie crust lesson is tedious and longer than the recipes I’ve been posting lately, but holiday season is fast approaching and maybe you’d like to try your hand at it, get some practice, so you can bring something “wow” to your family dinner this year.

HOW TO MAKE PIE CRUST

I rarely cook or provide recipes using the metric system, however, when it comes to pie crust I dutifully unwrap my scale and press the “grams” button. I’ve translated the measurements to cups and tablespoons, but I do prefer the certainty of the scale.

The following recipe is applicable only to the pastel de piña (pineappple pie) that follows. I read and reread my mother’s recipe for the Nicaraguan bakery staple, and unconventional as it is, it’s traditional. Normally, a tart or single crust pie such as lemon meringue is made by “blind” baking the crust: the tart mold or pie plate is lined with pie dough which is pricked to prevent puffing, lined with parchment or foil, weighed down, and baked prior to being cooled and filled. A double-crust pie like apple pie is filled raw: the pie plate is lined with pie dough, filled, and topped with a second, vented crust or with a latticed top, then baked.

Pastel de piña uses an unorthodox combination of the two methods: the crust is blind baked, filled, then topped with a lattice and returned to the oven.
PÂTE BRISÉE with EGG
Makes a double-crust for an 8- to 9-inch pie
Don’t skip any of the resting or chilling periods in the recipe, unless you want a shriveled, shrunken, or tough crust!

400 grams (2 ¾ cups) all-purpose flour
1 teaspoon salt
200 grams (15 tablespoons) chilled butter cut into ¼ inch pieces
2 eggs, lightly beaten
Ice water, as needed

1 egg yolk
2 teaspoons heavy cream
Pinch of salt

– Combine the flour and salt on a clean, dry work surface. With a bench scraper, cut in the butter until it resembles wet sand. Alternatively, combine the flour and salt in the bowl of a food processor and add the butter. Pulse until the mixture resembles wet sand, then transfer mixture to a clean, dry work surface.

– Form a well in the center of the flour mixture and pour in the eggs plus 1 tablespoon ice water.

– Working quickly, use the bench scraper to cut in the eggs and water. If the mixture appears very dry and crumbly, add water, 1 teaspoon at a time, until the mixture is cohesive but not overly wet.

– Bring the dough together with your hands. Pinch off pieces of dough (about 2-inch pieces) and with the heel of your hand extend on the surface. This method, called fraisage, ensures that the butter is evenly distributed in the dough. Shape the dough into a ball and cut it in half. Shape each half into a disc and wrap in plastic. Refrigerate for 30 minutes.

– On a lightly floured surface, roll the dough out to about 10 inches in diameter. Gently fold the dough into quarters and transfer to an 8-inch tart shell. Unfold the dough and press it into the shell. Trim off excess overhang and lightly prick all over with fork. Transfer the lined shell to refrigerator and chill 30 minutes, then, freeze for 20 minutes. Preheat the oven to 375˚F.

– Roll out the second dough disc on a piece of lightly floured parchment paper to 10 inches in diameter and cut into 8 1-inch-thick strips. Slide parchment and strips onto a baking sheet or jelly board and refrigerate.

– Line the chilled shell with foil or parchment paper (not wax paper!) and fill with pie weights or dry beans. Bake until the dough looks opaque, 20 to 25 minutes.

– Fill the pie shell with the pineapple mixture (see recipe below). Following photo 13, lay out four dough strips across the pie at about 1-inch intervals. Then, starting in the middle, lay one additional strip perpendicular to the original strips. Carefully weave the strips into each other, following figures 13 to 16.

– Beat the egg yolk, cream, and salt in small bowl. With a pastry brush, paint the egg mixture over the lattice top. Bake until golden, 30 to 40 minutes. Transfer pie to wire rack and cool to room temperature, 1 to 2 hours.

PASTEL DE PIÑA
Serves 6 to 8

1 large, ripe pineapple
½ cup water
2 tablespoons cornstarch
1 ½ cups sugar
1/8 teaspoon salt
4 tablespoons unsalted butter, cut into 1 inch pieces

Pineapple-Pie-FillingTo prepare the pineapple:

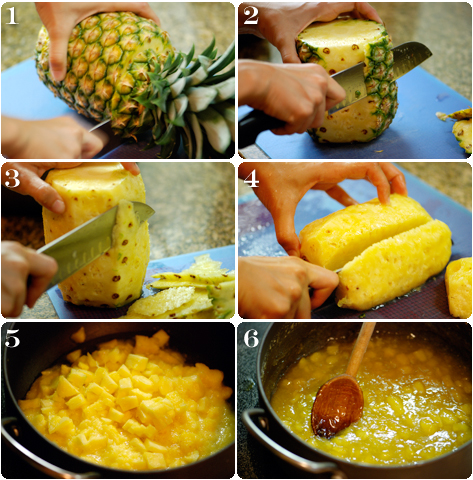
– With a chef’s knife, cut off the crown of leaves and about 1 inch from the base. Stand the pineapple upright and cut the prickly exterior off. If there are any “eyes” left, trim them.

– Lay the pineapple on its side and cut the flesh off; discard the core. Cut the pineapple into ½-inch pieces.

– Transfer half of the pineapple chunks to a food processor and pulse until pineapple is a thick puree.

– Transfer to a large pot.

– Whisk cornstarch and water together in a small bowl and stir into pineapple. Stir in the sugar and salt.

– Bring the pineapple mixture to a boil and simmer, stirring occasionally, until deep golden and jam-like, 45 to 60 minutes.  Off heat, stir in butter.

– Fill the blind baked crust and continue to recipe above.

I’VE GOT THE BLUES

DSC_0043

Summer in all its fury has arrived and though I hail from tropical climes I have no tolerance for high temperatures. Try as I might to ignore it, I feel the moist heat insidiously making its way into my skin through every tiny pore, till I am overcome by it, enshrouded as if by giant moth wings. Usually, when people are gadding about frolicking in the sun, I prefer to draw the blinds and hide in the cool comfort of air-conditioning.

Summer does have its positive points of course, one of them being ice cream. Though perfectly acceptable during cooler seasons, ice cream is a treat best enjoyed when the mercury rises tall. This past weekend O and I walked down the street to J.P. Licks for a scoop and were met with a long line of eager customers. A mound of cappuccino crunch was just what we needed to bring the temperature down.

This horrid 95˚F-plus weather has been here for a few days now, and just as foodstuffs are dried, salted, pickled, and canned for the barren winter months, so must the fridge be stocked with cold, refreshing foods like crisp greens, bright fruit punches, and obviously, ice cream in anticipation of days hot and humid.

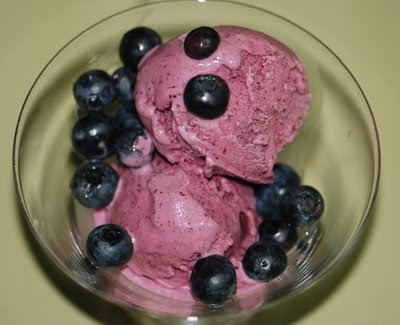
Rather than setting out daily under the unrelenting blaze of the sun for a cup or a cone, it is better to have a pint – or a quart – of something iced and creamy in the freezer. I’d come across this recipe for Blueberry Sour Cream Ice Cream in Dorie Greenspan’s “Baking” tome a few months ago, but was waiting for the appropriate weather forecast and ripe berries to come along, and finally, they did – hand-in-hand, too.

BLUEBERRY SOUR CREAM ICE CREAM
Adapted from “Baking: From My Home to Yours” Dorie Greenspan
Yields approx. 1 pint

Special equipment: ice cream maker & container in which to store the finished product – unless you plan on eating it all in one sitting, straight out of the bowl.

1 C. blueberries (you are free to use thawed and drained frozen berries)
1/3 C. sugar
Pinch of salt
Grated zest and juice of ¼ lemon
¾ C. heavy cream
¾ C. sour cream

-Put blueberries + sugar + salt + zest + juice in a medium, non-reactive saucepan and cook over medium heat, stirring, till mix boils and berries pop, about 3 minutes.

-Purée the mix in a blender till fairy homogenous, about 1 minute.

-Add heavy and sour creams and pulse just to blend.

-Taste and adjust flavor by squirting in a bit more juice, adding a pinch more salt, and/or a teaspoon of sugar.

-Refrigerate mix till completely cooled and process according to your ice cream maker’s instructions.

opener

PEACHY KEEN

6shortcake1
Just as soon as the weather turned warm, I became fixated on the idea of grilled peaches. I could picture them in all the glory of their sunset hue; ripe, juicy flesh tattooed with smoky grill marks…a dreamy side to a charred and crispy-skinned chicken leg…
That idyllic snapshot quickly faded when I discovered that the BBQs on our apartment complex’s rooftop are equipped with nothing but a puny electric rod, more similar to an archaic space heater than a grill. I may as well plop my food on top of my toaster oven.

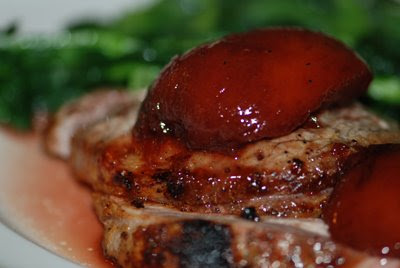
Since grilling was clearly an impossibility, I would poach the peaches. Granted, they would not be branded and flame-licked, but they could still be remarkable, especially as a side to salty, broiled pork loin. Make these peaches for dinner and be sure to throw in a few more for Peachy Keen Shortcakes.
4servewithporkRoasted pork loin with cherry poached peaches and sautéed broccoli rabe.

CHERRY POACHED PEACHES

6 ripe but still firm peaches
3 C. tart cherry juice
2 C. granulated sugar

-In a saucepan, combine cherry juice and sugar and bring to a boil, stirring until sugar is dissolved. Reduce to a low simmer.

-In a pot large enough to accommodate the peaches, bring four quarts of water to boil. In the meantime, set up an ice bath.

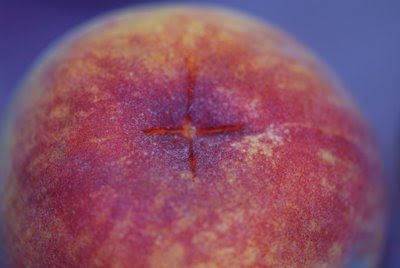
-With a paring knife, gently draw a small “X” on the bottom end of the peaches.
1Xyourpeach-Gently slide peaches into the boiling water. Allow about 20 seconds and quickly scoop out into the ice bath with a slotted spoon to stop the cooking.

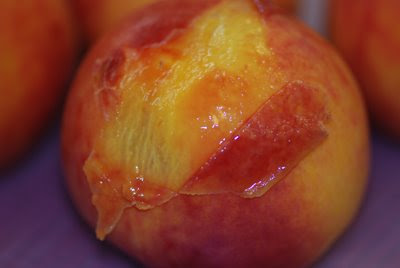
-This blanch-&-shock process will have loosened the skins. With a delicate hand, pull the skin away from the flesh, starting at the “X” you previously carved.
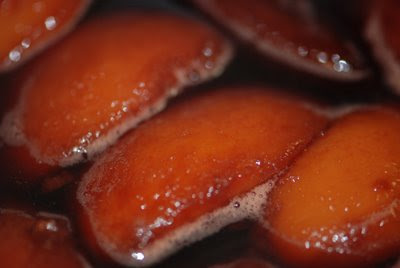
2blanchandshock-With a small knife, cut the peach in half, tugging at each to reveal the pit: remove and discard. Cut each half in half, lengthwise and slip into the simmering cherry syrup. Poach peaches 15 – 20 minutes and allow to come to room temperature.
3poachNOTE: Peaches are either clingstone, freestone, or semi-freestone. As the name implies, “clingstone” peaches will have flesh that tightly clings to the pit. Removing the fruit from the stone is thus a bit more difficult, so if given the choice, go for the freestone or at least the semi-freestone.

PEACHY KEEN SHORTCAKES
For 2 servings
This recipe is a play on more traditional fruit shortcakes and make a gorgeous brunch item.

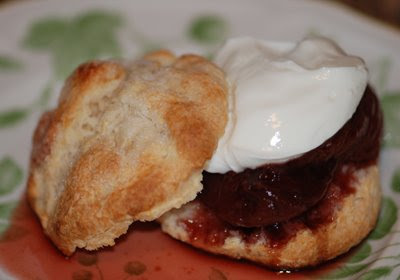
4 Best Ever Biscuits (Sweet Variation)
3 cherry poached peaches, at room temperature
1 container Greek yogurt (between 5 – 6 oz), stirred to smooth

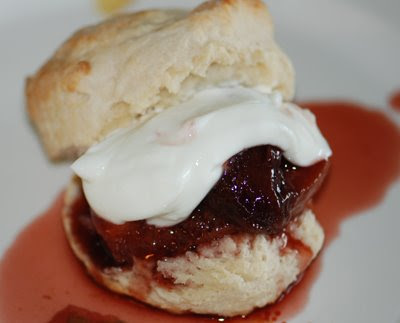
-As soon as the biscuits come out of the oven, pull apart into two halves.

-Top bottom half with three peach wedges and drizzle with poaching syrup. Dollop generously with yogurt and cover with the (sugar sprinkled) half.
7shortcake2

RICE REDUX

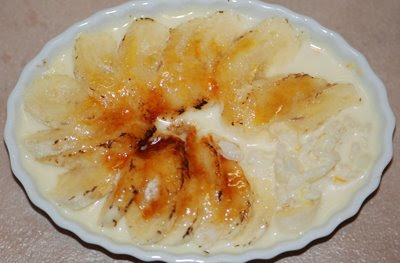
I couldn’t leave the rice pudding alone. It was such a nuisance to make that I needed to get the most out of it, I suppose, and that’s why I decided to play a little dress-up with it. I poured it into the crème brûlée dish, topped it with a fan of sliced bananas, sprinkled with sugar and gave it a good torching. And, voilà! Ritzy rice pudding with a lovely range of textures: crunchy caramel top, tender banana, and grainy rice pudding. I liked it so much I even considered making rice pudding again today…

reduc

RICE IS NOT NICE

Rice pudding has been on my mind lately and decided today would be a good day to make it. Señor O and I had a pretty heavy brunch on Sunday and today’s lunch was also on the hefty side, so no official meal was cooked today, leaving the afternoon open for a simple dessert.

I’ve only made rice pudding once before, the reason being I was pretty grossed out by it in the past; the texture was all wrong. However, riz au lait was part of my culinary school curriculum and it was during Session 19 of Level 2 that I was properly re-introduced to this dessert. I liked it. Lots.

In preparation for this afternoon’s riz au lait, some research was conducted. Joy of Cooking, Julia Child, Doña Angélica, and a number of random websites all cooked the rice in water prior to combining it with milk. My school’s version mixed them from the get-go, then baked for about 40 minutes. Easy enough.

There was no trouble at school, but of course, there was here. At the end of the designated time I pulled out the rice, and to my dismay, it was still drenched in milk. It hadn’t puddinged at all.

I was not smiling. This was supposed to be a breeze.

I moved the dish to the stovetop and decided to revert to methods I’d read about, namely stirring till most of the milk was absorbed. It was at this juncture that the bottom of the pot began to turn nasty and brown. I poured out the swamp rice into a new glass Pyrex and called it quits. I didn’t have another suitable container if this one scorched, so that would have to be that.

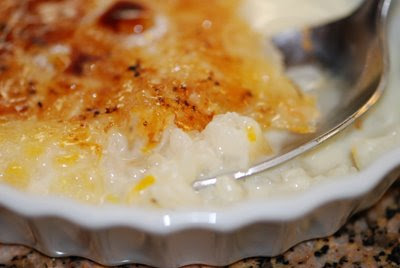
A lot displeased and not a little bit chagrined, I made one last, desperate attempt to save – or at the very least conceal – my rice pudding. I put it into a crème brûlée mold, sprinkled it with sugar, and torched it.

My pyrotechnics did the trick, and the rice was delicious, but I’m still bothered. What was meant to be a single-dish, super-easy to prep dessert turned into a major dish pileup. Next time I’m going stovetop all the way. And I might try coconut milk and pineapples instead of vanilla bean and orange zest.

ricepudding

P.S.
The rice pudding was perfectly delicious a day later. It’s cold and refreshing, all vanilla bean-y and citrusy…which has prompted me to print the recipe:

100 g. arborio rice (about 1/2 C.)
1 L. whole milk (about 1 quart or 4 C.)
1 TBSP. grated orange zest
2 tsp. grated lemon zest
1/2 vanilla bean pod, split and scraped
pinch of salt
100 g. granulated sugar, split 50/50 (about 6 TBSP.)
2 TBSP. butter
1 egg yolk

In a saucepan, bring to a boil milk + orange zest + lemon zest + vanilla bean + salt.

Add rice + 50 g. (3 TBSP.) sugar and cover with a parchment paper lid. Finish cooking in a 350˚F oven (45 – 60 minutes — the rice should be tender and the milk absorbed. It may take longer, as in my case, depending on your oven).

When done, add butter + yolk + remaining 50 g. (3 TBSP.) sugar. Remove vanilla pod.

Serve warm or chilled.


FOAM DOMES

I was about two years younger than most of my classmates through junior high and high school. It was a terrible ordeal. While I thought I was mentally and psychologically on par with everyone, I knew for a fact that physically, I was way, way behind. The gawky teenage years were magnified and multiplied, tragically, for me. I had braces and breakouts well into my junior and senior years, and most dooming of all – I was completely flat chested. I had no hope of ever catching up.

High school is far behind and though I remain somewhat impaired in the aforementioned area, I have moved past it. Or so I thought.

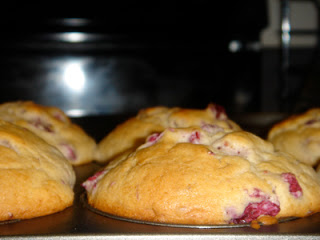
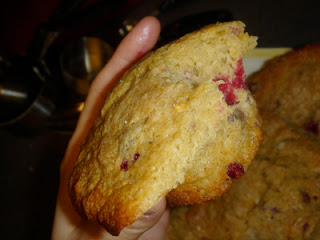
Recent activities in my kitchen have shown that I am not as over flatness as I thought. For the past few days I have been on a quest to bake the perfect muffin. Though a firm believer in “it’s what’s inside that counts,” I’ve been unable to turn a blind eye to aesthetics. Why is it that 99{7e75139007ced55322cd19a88b90f170970c9802fa5abc2ce00631fcd14484e3} of these muffins refuse to blossom? I’ve creamed, I’ve smashed, I’ve gently folded, and roughly chopped, but seemingly to no avail. There they are, the woefully prepubescent little things, strewn all over the kitchen counter. And of course, as might have been expected, there is a Barbie to these muffins’ Skipper: one recipe yielded gorgeous cupolas, and try as I might, I cannot get the others to do the same. These weren’t the tastiest of the twelve batches I’ve thus far prepared, but in high school and in life, it’s the tall busty blonde that’s noticed first, and so I continue to bake, searching for a muffin that has both brawn and brains. Should I create this Wonder Woman of a cake, I will post the how-to. In the meantime I remain,

Awkwardly yours,

HH&F

barbie

Barbie
skipper
Skipper


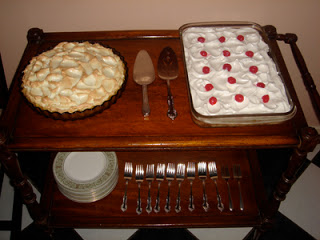
LOVE LETTER TO A DESSERT CART

Many, many years ago, my parents would pick me up from school and take me to a lovely restaurant with an even lovelier view of a lake. Dressed in the dark green plaid jumper that was my uniform, I marched in behind mom and dad as the maître d’ gushed over us all and led us gracefully to what dad had at some point decided was the best table.

This was a fancy restaurant with white tablecloths, ice sculptures of swans, waiters whose shoes shone and smiles sparkled as they poured bubbly water and the fruitiest fruit conga I have ever sipped. A bread basket worthy of kings and queens would carried out moments after my chair had been pushed up to the table and my mouth would water as I gazed at minuature baguettes, flaky croissants, hearty rolls of nut-studded wheat, and long, crunchy grissini. After making a careful and difficult selection, beautiful pale butter ridged like the most perfect seashell would be delicately placed on my plate.

Lunch was usually filet mignon with béarnaise, which I would spoon on without any qualms…all this luxury, just for me. The filet was always accompanied by pommes soufflé, and there was nothing like those golden, crispy pillows of fried potato. I knew I was a lucky girl to be allowed to eat this way.

But, the best was yet to come. Enter The Dessert Cart. Aside from the deboned chicken that I’ve written about time and time again, The Dessert Cart is for me the ne plus ultra. There is absolutely nothing that compares to it. I dream of owning a dessert cart (and a wet bar, but we’ll talk about that later) and loading it up with chic sweetings. The Dessert Cart at this particular restaurant was all wonder and delight: floating islands, baked Alaska, dense chocolate cake, goblets of ripe red berries, sauce boats, and my favorite, profiteroles. Three perfect puffs would present themselves, lightly golden and starting to ooze out ice cream filling, and then, the waiter would pour the hot chocolate sauce over them, coating them slowly and seductively.

DSC01565
My Mister’s grandmother’s dessert cart.

ICE ICE BABY

I made vanilla ice cream with brownie bits in it this weekend. I am ashamed to admit that I was talking on the phone while making the crème anglaise base for the ice cream, and as a result, it curdled a bit. A lot, actually. There were enough scrambled eggs at the bottom to make a McMuffin, and while I was tempted to toss the whole thing out, I also had a fresh batch of brownies waiting to be enveloped by creamy ice cream, so I tossed out the lumps and carried on. It turned out really well, despite the earlier trouble. Looks good, no?
A

There are several varieties of ice cream: standard or Philadelphia-style, which is your basic milk and/or cream plus sugar plus flavorings; French, which is what I made this weekend – it’s basically a fluid egg-based custard that you can eat as desssert with cake, fruit, etc., or pop in the ice cream maker; gelato, the Italian confection with is a richer, more dense version of the previous examples; and the ever-expanding froyos, Tasti Delites, and Pinkberrys of the world, whose compositions I can’t actually claim to know a thing about. All of these desserts are prepared by pouring the flavored liquid into a machine that churns it in a cold bowl until the mix freezes, and voilà! Icecreamgelatofroyoetcetcetc.

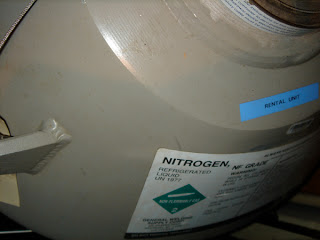
Usually this process takes about half an hour, which is fine, but in today’s instant-gratification culture, who has time to wait 30 minutes? Wouldn’t it be magical if there were a potion that could turn your chocolate milk into chocolate ice cream in under five minutes? Science? Fiction? Infomercial? FACT, my friends. All you need is liquid nitrogen! I won’t disclose how or where I came by it, but I will say that it was super cool – no pun intended. Milk + sugar + vanilla + liquid nitrogen = lots of billowing clouds and ice cream in three minutes flat. Eat your heart out, Bill Nye.
1
2_002

3
4
5
6