Yearly Archives: 2008

BEST IN SHOW

DSC_0120

Come November, people inevitably start talking turkey. Food magazines arrive with sumptuous roasted birds on their covers, and TV shows all dole out advice on brining, basting, and carving, while the Butterball folks do a thorough ear swabbing to make sure panicky callers’ questions regarding turkey troubles come through loud and clear. I however, boycotted the Turkey Talk-Line® once again, opting for a bird of a different feather this year: duck.

I guess despite my love for the Macy’s Thanksgiving Day Parade and secret wish that one day I’ll win Megamillions and be able to afford an apartment on the Upper West Side from where I’ll be able to watch said parade while hosting lavish parties, I didn’t grow up with all-American Thanksgivings. I honestly can’t remember when or why we started observing Thanksgiving. Anyway, I now appreciate it mostly for its nondenominational quality; it’s a family holiday that people of all races and creeds can participate in and enjoy and be thankful (or not-so-thankful, as the case may be) for. That being said, I have no deep-rooted loyalty to Thanksgiving’s mascot, the turkey.

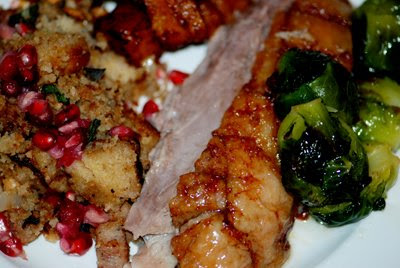
Having never cooked duck at home before I was a little nervous, but it seemed fated to succeed. A few days ago I watched a mouth-watering Jamie Oliver episode where he slow-roasted a duck, then someone at work mentioned he was making slow-roasted duck for Thanksgiving and promised to send me the recipe, and wouldn’t you know it? It was Mr. Oliver’s! I took only the essence of the recipe, which was to generously salt the duck inside and out, cook in a 350˚F oven for 1 hour, then for an additional 1 ½ hours at 300˚F, twice or thrice ladling out (and reserving!!!) the duck fat. It was perfection – and a monkey could make it.

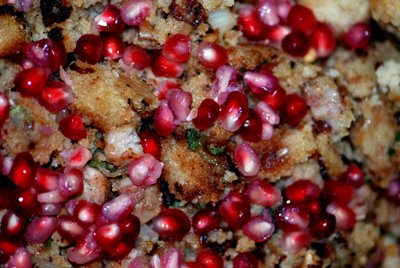
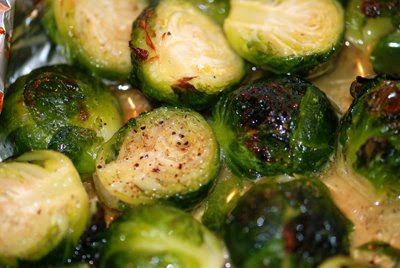
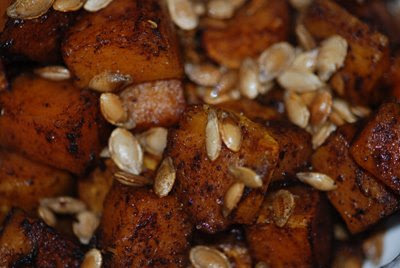
Last year there were about 10 of us at dinner, and I transported food across state lines – food I’d started preparing about two weeks in advance – but this year there were only three of us, and I decided I’d take it easy… No running around with half a pat of butter in my frizzy, frazzled hair, no cursing (OK, that’s a stretch – there’s always a little cursing in the kitchen), no sweating, no too-tired-of-looking-at-the-food-to-eat. No, this year, I watched the Macy’s parade and then the dog show (the Pointer won, but I was rooting for the Frenchie) and finally started roasting the duck at 4:00pm, beer in hand (I like to keep it classy). The sides – cornbread stuffing with duck sausage, toasted hazelnuts, sage, and pomegranate seeds; spiced roasted butternut squash with toasted squash seeds; and duck-fat roasted Brussels sprouts – came together once the duck was almost ready. It was the way to go – the secret was the no-nonsense, foolproof centerpiece. If we had a National Bird Show on Thanksgiving, I’m sure turkey would be Best in Show, but I’d still be rooting for the underdog – or duck.

stuffing

sprouts

squash

TOPSY TURVY

cake
Once upon a time, in the faraway land called Matagalpa, my great-grandmother made an upside-down pineapple cake – or pineapple turnover, as she called it. This turnover was subsequently made by my grandmother, then my mother, and a few weeks ago, me. Everyone knows pineapple upside-down cake, but it’s not quite as chic as say, flourless chocolate cake. I suppose its out-of-a-can-pineapple topping and occasional studding with maraschino cherries is a little kitschy and June Cleaver-ish, but why not? Sometimes a piece of cake from memory lane is just the thing.

PINEAPPLE TURNOVER
DSC_0024This recipe calls for a cast iron skillet, but as my skillet is seasoned with bacon and beans, I used my tarte tatin pan, which is about 10 inches in diameter. If memory serves me, my mom has made this in a 9 x 13-inch pan.

1 stick (4 ounces) butter
1 cup milk
1 ½ cups white sugar
1 teaspoon vanilla extract
2 eggs, separated
1 ½ cups brown sugar
2 teaspoons baking powder
2 cups flour
5 slices of pineapple
5 cherries (optional)

-To make batter, cream ½ stick of butter with white sugar. Mix in well with egg yolks. Sift together flour and baking powder, and add alternately with milk. Add vanilla.
-Beat egg whites and fold in batter. Set aside.
-In cast iron skillet, place ½ stick of butter in small dabs, and add brown sugar, pouring evenly over butter. Place 1 slice of pineapple in center of pan and other slices around, centering each with a cherry. Pour batter over this and bake in a slow oven, 300 degrees F. for 1 hour or until done.
-Test by inserting toothpick in center of cake and when toothpick comes out clean it is done!
-Enjoy!

pineapplesI had leftover pineapple chunks and used them instead of rounds.

DSC_0023

CANDY IS DANDY…

1…but liquor is quicker.

I’ve been deathly ill since Friday and don’t seem to be getting any better, despite having marinated in VapoRub all weekend long. I thought I had the croup, but am now convinced that it’s galloping consumption. In addition, I’ve lost my voice. Am seriously considering hanging a small slate around my neck and communicating via chalk missives. I tried sign language at work today, but don’t think the single crude finger signal I know counts as proper signing.

I’ve been self-medicating with OTC meds and bagfuls of Ricola, but those little suckers aren’t very effective. My mother suggested a home-brewed concoction, and though it may sound a bit iffy at first, you’ll warm to it as soon as you see there’s a little sneaky peek in the mix. It’s not a cure-all, maybe not even a cure-anything, but it’s a wonderfully soothing nightcap. ¡Salud!

MILK & MIEL

1 cup milk
1 cinnamon stick
2 tablespoons honey (more to taste)
¼ cup dark rum

-Bring all ingredients to a slow simmer over medium heat.
-Pour into mug and serve.

DSC_0003P.S.This is not a Bacardí endorsement. I just couldn’t get Flor de Caña.

CHOPPING BROCCOLI

1broccolirawI was out of town the week before last and came home to a near-empty fridge and a series of dinners that I can’t even recall right now, they were so unmemorable. I think there was a lot of cereal. And plain spaghetti.

This dinner lethargy spilled over into the weekend and again, I stared into a vacant ice box. There were some flour tortillas, a tiny tub of mango and red onion salsa (which I have yet to throw away), a container with leftover red bell pepper tops and bottoms, a depleted box of Maison du Chocolat assorted chocolates, vermouth, and a bag of carrots which are starting to sprout monster roots. Not my finest moment. I did, however, have a drawerful of beautiful broccoli rabe which I was determined to eat my way through this weekend. And I did. All 3.5 pounds of it. If you’re wondering how I didn’t get sick of it, see below for the various interpretations of that brash, biting green (which is a relative of the turnip, and not broccoli, if you were wondering):

SATURDAY: Broccoli rabe “fritto” – inspired by the Zuni Café Cookbook

1 bunch broccoli rabe
2 cups flour (unbleached all-purpose or whole wheat)
1 cup cornmeal
2 cups plain yogurt
vegetable oil
salt & pepper

-In one shallow dish, spread out the flour and cornmeal and combine well. Pour the yogurt into another shallow dish and season generously with salt and pepper.
-Heat about two inches of vegetable oil in a frying pan over medium-high heat.
-Meanwhile, one at a time, dunk each stalk of broccoli rabe into the yogurt then coat with the flour mix. Lay the coated broccoli on a baking rack.
2coatedOnce all the broccoli rabe is coated, fry until golden in the hot oil. Make sure the broccoli bubbles somewhat violently when you place it in the oil: if you try in cool oil you’ll have a wilted, soggy mess. Also, don’t overcrowd the pan.
Transfer the fried broccoli rabe to a paper towel-lined plate and sprinkle with salt.
Serve.

3friedSUNDAY: Broccoli rabe with toasted bulgur wheat and dates

1 cup bulgur wheat
2 cups water
olive oil
1/3 cup dried dates, chopped
1 bunch broccoli rabe
2 garlic cloves
½ teaspoon red pepper flakes
salt & pepper
anchovy fillets (optional)

-Set water to boil in a large pot.
-Separately, in a small saucepan, start the wheat. Heat about 1 tablespoon olive oil over medium-high heat. Add the bulgur wheat and cook, stirring, until deep golden and toasty. Add dates, 1 teaspoon salt, a few generous grindings of pepper, and water. Boil until the wheat’s surface is visible, reduce the heat to low, cover, and cook until all water is absorbed, about 15 minutes. Set aside.
-Cook broccoli rabe in boiling water with 1 tablespoon salt until tender, 2 to 3 minutes. Drain, run under cold water until cool enough to handle, drain again, and transfer to a cutting board. Coarsely chop broccoli rabe.
-Heat 2 tablespoons oil in a large skillet over high heat. Add garlic and red pepper flakes and cook, stirring, 1 to 2 minutes. Add broccoli rabe and sauté until heated through, about 3 minutes. Season with salt and pepper.
-Serve broccoli rabe atop bulgur wheat. Top wih anchovy fillet.

4withdatesMONDAY: Broccoli rabe, bacon, and cannellini bean pasta
5bacon

2 strips good bacon
½ teaspoon red pepper flakes
olive oil
2 garlic cloves, finely sliced
1 15-oz. can cannellini beans, drained
1 bunch about 12 oz. broccoli rabe
8 oz. angel hair / cappellini pasta

-Set water plus 1 tablespoon salt to boil in a large pot.
-Heat 1 tablespoon oil in large skillet over medium heat. Add bacon, garlic, and red pepper flakes and cook, stirring, until bacon is cooked through. If bacon begins to burn, lower the heat.
-Cook broccoli rabe in boiling water until tender, 2 to 3 minutes. Do not drain water: transfer broccoli rabe with tongs to colander set over large bowl. Run broccoli rabe under cold water until cool enough to handle, drain again, and transfer to a cutting board. Coarsely chop broccoli rabe.
-Add cannellini beans to bacon skillet and cook 2 to 3 minutes. Add the broccoli rabe and cook until heated through, about 3 minutes. Season with salt and pepper.
-Add pasta to boiling water and cook until al dente. Reserve ¼ cup of cooking water, then drain pasta and return to pot. Add 2 tablespoons olive oil, reserved water, and broccoli rabe mixture. Toss to coat and serve with grated parmesan.

DSC_0111


BACK IN THE SADDLE AGAIN

openerI wish I could say I’d been off summering somewhere fabulous and glitzy, but the reason behind my long absence is much more plebeian and pedestrian: I started working and have been acclimating to my new situation. That being done, I am now back and ready to start feeding the blog – it’s looking a bit gaunt at the moment.

To ease into things, a simple recipe of French toast – quick and comforting for those Sunday mornings when the promise of Monday starts looming ominously in the distance:

For 4 (or 2 with roomy stomachs)

1 C. milk
3 whole eggs
½ C. plus 1 TBSP. granulated sugar
¼ tsp. salt
1 tsp. vanilla extract
3 TBSP. butter
8 tsp. cinnamon
8 slices hearty bread
¼ C. toasted pecans or walnuts, toasted
2 bananas, sliced into ¼”-thick rounds

-In a pie plate or shallow bowl, whisk together milk, eggs, 1 TBSP. sugar, salt, and vanilla.

-Heat a large nonstick skillet over medium-high heat and add 1 ½ TBSP. butter. When the butter begins to foam, sprinkle the skillet with 2 TBSP. sugar and 1 tsp. cinnamon.

sugarpan-One at a time (or two, if they fit) dip 4 bread slices in the egg mixture, turning to coat (don’t let the bread just sit there unless you want mush for breakfast). Arrange the dipped slices on the sugared’n’cinnamoned skillet and cook till nicely browned, 2 to 3 minutes.

placebreadonskillet-While that first side is cooking, sprinkle the soggy side facing you with 2 TBSP. sugar and 2 tsp. cinnamon. Flip bread and cook opposite side. You should have a lovely crunchy crust on your toast.
Repeat dipping, buttering, sugaring’n’cinnamoning, and cooking with remaining bread slices.

-Arrange French toast on plates and top with pecans and sliced banana. Sprinkle with powdered sugar and serve with maple syrup, if desired.

finishedproductNOTES: Under no circumstances should you use flimsy sliced white bread for French toast. It’ll soak up all the liquid and be a hopeless wet mop of a thing. Stick to heartier stuff like challah or those so-called Italian loaves… I like a croissant now and then (but then I top it with whipped cream and berries), but only if it’s a sub-par one – no sense in using a perfect specimen for this.

ADIOS, COLONEL

120470303_2bb3365c08_o

Kentucky Fried Chicken is a thing of the past to me. I don’t have beef with that fast food chain in particular – although that rat infestation at a downtown New York City branch a summer or two ago was pretty bad – but for one reason or other, that red-and-white bucket hasn’t graced my dinner table in many a moon. However, the memory of the Colonel’s secret 11-herbs-and-spices recipe is forever embedded in my brain and taste buds.

I’ve eaten fried chicken several times at my paternal grandmother’s house – pollo a la canasta (basket-style chicken – perhaps alluding to a picnic basket?) in local parlance – and it appeared every now and then at home. Also, there’s a chicken chain in Nicaragua called Tip-Top that built its fame on fried chicken, and once in a while on Sundays we’d have lunch there on our way to my grandparents’ house in Granada. All were good and had that homemade touch, but that was just the problem, they were very obviously homemade and lacking that extra-crispy skin. I wanted the Colonel’s secret.

None of my kitchens have ever witnessed fried chicken. I was always afraid of the stink all the frying would produce, I had concerns about flabby skin and undercooked chicken, I didn’t have a recipe I trusted, etc. etc. Fried chicken was just not an option. The closest I ever got was buying Tyson’s breaded chicken fingers. And I baked those.

Last week, though, as people at work geared up for the long 4th of July weekend, I got a hankering for fried chicken. I don’t have a grill, so barbecue was out, and fried chicken seemed to be a very all-American, very apropos thing to make. I was so caught up in the idea that I didn’t even consider my previous fears and hesitations. And, as luck and fate would have it, I came across a special issue of Cook’s Illustrated titled “American Classics.” There on the cover, was the most beautiful, textured, mahogany-colored plate of fried chicken I’ve ever seen. There was no stopping me now; I would become the Colonel.

Preparation is a bit intense, but, so worth it. I made one bird and ate most of it – with the help of the husband – in two sittings. We miraculously had a leftover breast which we ate out of the fridge the next day and though not warm and as crunchy, it remained incredibly finger lickin’ good. Make it for a crowd – spread the love.

FRIED CHICKEN
Adapted from Cook’s Illustrated
close-upofchicken

As I mentioned above, the prep time is a bit lengthy, but cooking goes by in a flash – and it’s not smelly, believe it or not. Make sure you have at least one grid rack, and instant read thermometer.

½ cup plus 2 tablespoons table salt
¼ cup sugar
2 tablespoons paprika
3 medium garlic heads, cloves separated
3 bay leaves
2 quarts low-fat buttermilk
1 whole chicken (about 3 ½ pounds), giblets discarded, cut into 12 pieces (each breast cut in half crosswise, thighs and drumsticks separated, wings cut into two pieces)
4 cups unbleached all-purpose flour
1 large egg
1 teaspoon baking powder
½ teaspoon baking soda
3 – 4 cups refined peanut oil or vegetable shortening

fryingchicken

-In large zipper-lock bag, combine salt, sugar, paprika, garlic cloves, and bay leaves. With rubber mallet or flat meat pounder, smash garlic into salt and spice mixture thoroughly. Pour mixture into large plastic container or nonreactive stockpot. Add 7 cups buttermilk and stir until salt and sugar are completely dissolved. Immerse chicken and refrigerate 2 to 3 hours.

-Remove chicken from buttermilk brine and shake off excess, discarding any garlic and bay leaf bits. Place chicken pieces in single layer on a large wire rack set over a rimmed baking sheet. Refrigerate, uncovered, for 2 hours. (You can refrigerate in for an additional 6 hours – just make sure you cover chicken with plastic wrap).

-Measure flour into large shallow dish. Beat egg, baking powder, and baking soda in medium bowl; stir in remaining 1 cup buttermilk (mixture will bubble and foam). Working in batches of 3, drop chicken pieces in flour and shake dish to evenly coat. Shake excess flour from each piece, then, using tongs, dip chicken pieces into egg mixture, turning to coat well and allowing excess to drip off. Coat chicken pieces with flour again, shake off excess, and return to wire rack.

-Line large plate with double layer paper towels. Heat oil (oil should be 2 ½ inches deep in pan) to 375˚F over medium-high heat in large 8-quart cast-iron Dutch oven with a diameter of about 12 inches. (I made mine in a 4-quart capacity and had no trouble – just make sure you can safely add the oil and chicken without causing an overflow).
Place half the chicken pieces skin-side down in oil, cover, reduce heat to medium, and fry until deep golden brown, 6 to 8 minutes. After about 3 minutes, uncover the pan, lift the chicken pieces with tongs to check for even browning; rearrange the pieces if some are cooking faster than others. Check the oil’s temperature – at this point it should be at about 325˚F.

-Once the first side is deep golden brown, turn the pieces and cook the opposite side 6 to 8 minutes, uncovered. Transfer to paper towel-lined plate, allow to drain, then transfer to wire rack.

-Meanwhile, bring the oil back up to 375˚F and cook the remaining chicken in the same manner.

-Devour.

platedchicken

OPEN WIDE

theirburger

A Counter burger.

In anticipation of our May trip to Los Angeles, the husband and I spent countless hours researching the food scene of that city. As it was a family trip, we knew we’d have a jam-packed schedule, and thus much time was spent by Señor O in mapping out eateries and reviewing menus and online comments. At last, our selections were meticulously organized into an Excel spreadsheet and off we went. Don’t laugh – this document was as precious to us as maps of the stars’ homes are to Hollywood tourists.

Among the places we chose to visit was The Counter, a burger joint that claims to offer 312,120+ different, DIY, burger combinations said to be “as unique as each customer.” I don’t know who crunched the numbers necessary to come up with that figure nor how exact it is, but I can confirm that the number of choices offered on their check-this-box-if-you-want-this-on-your-burger menu is dizzying:

OK, I think you get the gist of it. The only things really missing from this vast menu are whipped cream and maraschino cherries – I think those are reserved for their equally exorbitant shakes.

It took me a while to settle on a 1/3-pounder beef burger with Gruyère, grilled pineapple, bacon, and I forget what else. I really wanted a fried egg but thought that with the grilled pineapple and other etc.’s would be a bit much. Imagine then my surprise when I opened up Gourmet’s July issue to discover the Aussie Burger, a Down Under burger that could hardly be contained between two buns. The ingredients in this Oz-worthy sandwich: beef patty, fried eggs, grilled pineapple, pickled beets, grilled onions (optional), and chile mayo. One glance at this whopper’s gorgeous photo was all I needed to declare it Burger Night – plus, I’d baked rolls the day before and the leftovers would be put to very good use.

Behold, my Open-Wide-and-Say-Ahhh-Burgers:
DSC_0071
opener

CORN OFF THE COB

1corn

Sinking your teeth into the sweet, tender crunchiness of a fresh ear of corn is one of summer’s indubitable pleasures, the butter-slathered kernels yielding to your eager bite, the salt crusting your upper lip. For many of us, that first bite acts as a time machine, transporting us to the county fair or the Sunday afternoon backyard barbecue of our youth. My corny time machine takes me to Reino Aventura, a Six Flags-like amusement park in Mexico City where I had a Corn on the Cob, The Extreme Version: grilled corn generously schmeared with mayonnaise, sprinkled with grated cheese and chile piquín, and finished off with a squirt of lime.

But, regardless of whether it’s consumed in English or en español, nibblers will agree that eating corn on the cob has some unattractive side effects; bits and pieces of kernel stubbornly fix themselves in our gums, between our canines, incisors, and molars, making our faces contort and twitch as we not-so-discreetly attempt to dislodge them with the tips of our tongues. Even in the comfort and privacy of my own home, I can’t stand the struggle.

So, the other day when I was craving Mexican street corn, I decided I’d deconstruct the local treat and serve it forth in a bowl. It would be a much more Emily Post-ish eating experience, besides which I would be able to get larger mouthfuls (not so Emily Post, in the end).

Though versions abound, this is my recipe for Mexican Corn Off the Cob. Serve it as a side dish to grilled steak, fajitas, or as a topping for quesadillas.

MEXICAN CORN OFF THE COB
Serves 2 to 3

6 ears of corn, husks and silk removed (yields approx. 3 cups of kernels)
2 tsps. corn oil
2 to 3 TBSP. mayonnaise
Juice of one lime
chile piquín or chile de árbol flakes, to taste
1/3 C. grated cotija cheese

-With a small, sharp paring knife, scrape the kernels off the cob. Work in a large shallow bowl so you can catch the kernels as well as any milk that may leak out.

-Heat oil in a large skillet over high heat until shimmering. Add kernels and toss to coat in oil. Either stir or shake kernels constantly until they are nicely toasted – I prefer mine a bit charred.

-Pour corn into a serving bowl and season with salt and pepper. Stir in mayonnaise, then sprinkle with chile and cheese. Drizzle with lemon juice and serve.

4decob“De-cobbing.”

BRAN-Y AND BEAUTIFUL

1opener

If you played a word association game and the term “bran” was thrown at you, chances are you’d blurt out responses like, “constipation!” “old people!” “laxatives!” Whenever I’m in the cereal aisle and I see that box with the big, bold All-Bran logo, cheap and very literal toilet humor comes to mind. Note to Kellogg’s: making John McEnroe the star of your 10-Day Challenge commercials isn’t going to increase cereal sales. If you were to wake up to find John McEnroe perched at your bedside, wouldn’t you just go right then and there, thereby negating the need to have a bowl of Kellogg’s All-Bran?

Let’s turn our attention now to bran in its baked incarnation: the bran muffin. It’s the ugly duckling of the breakfast breads with its dung brown color and lack of accessories in the form of streusel topping and/or chocolate chips. If you’re a late morning arrival at the office cafeteria, it’s usually only crumbs and bran muffins that remain.

But despite the fault-finding I’ve been doing, I do like bran cereal and muffins. I do! Sliced bananas and a handful of blueberries make those dry doodles agreeable, and a great bran muffin is nutty, tasty, and won’t sit like an undigested rock in your stomach. I hadn’t baked any in years, and was happily surprised with the results I got from this recipe. These muffins are moist and light and can be eaten plain, spread with butter and good preserves, or my favorite, split in half and grilled a day later. P.S. to Kellogg’s: These are a far better advertisement than Mr. McEnroe.

EVERYDAY MAPLE-BRAN MUFFINS WITH BLUEBERRIES
Adapted from “The Art of Quick Breads” by Beth Hensperger
Yields about 1 dozen standard muffins.
3optional

1 ½ C. cultured buttermilk or plain low-fat yogurt
2 eggs
¼ C. (½ stick) unsalted butter, melted
¼ C. vegetable oil
¼ C. pure maple syrup
1 ½ C. All-Bran cereal
1 ½ C. fresh or unthawed blueberries
1 C. unbleached all-purpose flour
½ C. wheat or oat bran flakes
¼ C. light brown sugar
1 tsp. baking powder
1 tsp. baking soda
¼ tsp. salt

-Preheat the oven to 400˚F with rack in the center.

-Grease a standard 12-cup muffin tin.

-In a large bowl, whisk together: yogurt or buttermilk + eggs + melted butter + oil + maple syrup + All Bran.
Stir in the blueberries and allow to stand at room temperature 5 – 10 minutes.

-In a different bowl, combine the remaining (dry) ingredients.

-Once the All Bran mix has rested, add the dry ingredients mix and stir briskly with a large spatula or spoon till evenly moistened, using no more than 15 strokes.

-Spoon the batter into each muffin cup, filling till nearly level with the top of the pan.

-Bake 20 – 25 minutes until browned and a cake tester comes out clean.

-Allow muffins to rest in tin about 5 minutes before turning out on rack to cool. Serve warm.

-To freeze leftovers: Cool completely and wrap muffins individually in wax paper and store in plastic baggies.

-To serve frozen muffins: Warm in a 350˚F oven, microwave 20 – 30 seconds, or split in half horizontally, butter both sides of each half and grill over medium heat till golden and hot.
2leftoversGrilled muffins served with fruit salad and honey-laced yogurt.

I’VE GOT THE BLUES

DSC_0043

Summer in all its fury has arrived and though I hail from tropical climes I have no tolerance for high temperatures. Try as I might to ignore it, I feel the moist heat insidiously making its way into my skin through every tiny pore, till I am overcome by it, enshrouded as if by giant moth wings. Usually, when people are gadding about frolicking in the sun, I prefer to draw the blinds and hide in the cool comfort of air-conditioning.

Summer does have its positive points of course, one of them being ice cream. Though perfectly acceptable during cooler seasons, ice cream is a treat best enjoyed when the mercury rises tall. This past weekend O and I walked down the street to J.P. Licks for a scoop and were met with a long line of eager customers. A mound of cappuccino crunch was just what we needed to bring the temperature down.

This horrid 95˚F-plus weather has been here for a few days now, and just as foodstuffs are dried, salted, pickled, and canned for the barren winter months, so must the fridge be stocked with cold, refreshing foods like crisp greens, bright fruit punches, and obviously, ice cream in anticipation of days hot and humid.

Rather than setting out daily under the unrelenting blaze of the sun for a cup or a cone, it is better to have a pint – or a quart – of something iced and creamy in the freezer. I’d come across this recipe for Blueberry Sour Cream Ice Cream in Dorie Greenspan’s “Baking” tome a few months ago, but was waiting for the appropriate weather forecast and ripe berries to come along, and finally, they did – hand-in-hand, too.

BLUEBERRY SOUR CREAM ICE CREAM
Adapted from “Baking: From My Home to Yours” Dorie Greenspan
Yields approx. 1 pint

Special equipment: ice cream maker & container in which to store the finished product – unless you plan on eating it all in one sitting, straight out of the bowl.

1 C. blueberries (you are free to use thawed and drained frozen berries)
1/3 C. sugar
Pinch of salt
Grated zest and juice of ¼ lemon
¾ C. heavy cream
¾ C. sour cream

-Put blueberries + sugar + salt + zest + juice in a medium, non-reactive saucepan and cook over medium heat, stirring, till mix boils and berries pop, about 3 minutes.

-Purée the mix in a blender till fairy homogenous, about 1 minute.

-Add heavy and sour creams and pulse just to blend.

-Taste and adjust flavor by squirting in a bit more juice, adding a pinch more salt, and/or a teaspoon of sugar.

-Refrigerate mix till completely cooled and process according to your ice cream maker’s instructions.

opener